
Tested: Rogue Panda Ripsey Seat Bag & Harness Review
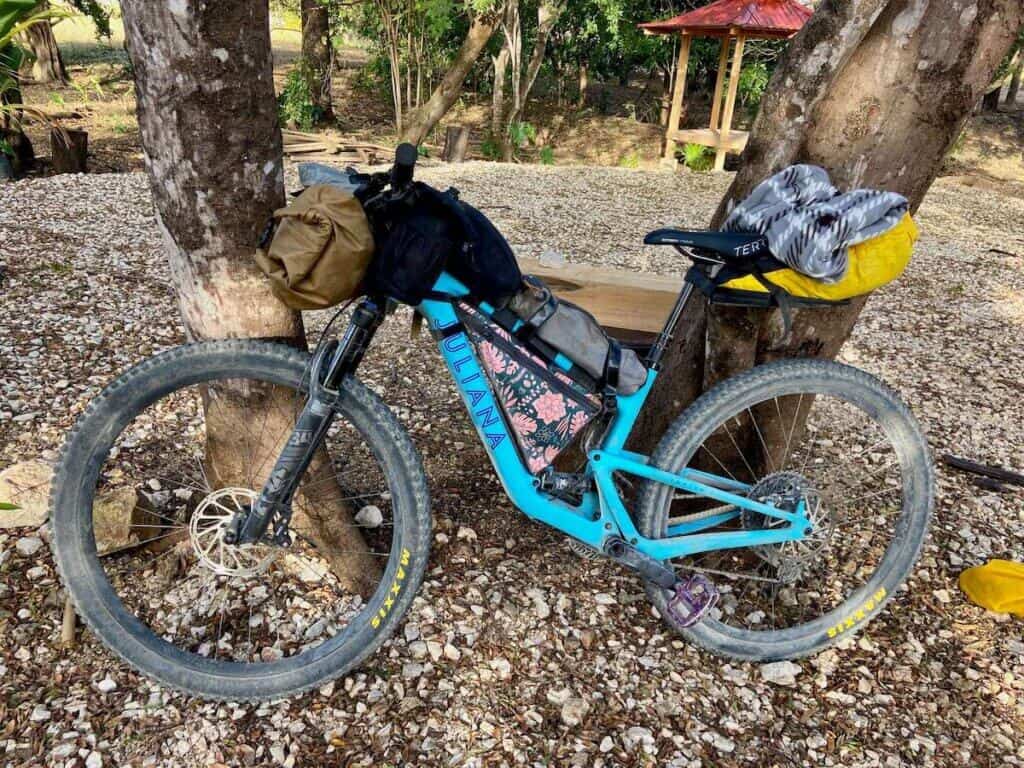
I recently got to test out the new Rogue Panda Ripsey Seat Post Bag on my 460-mile bikepacking adventure through Costa Rica. Let me just say that bikepacking bags have come a long way!
Seat post bags have traditionally been bulky, heavy, awkward, unstable, and worst of all, a pain to load and unload with gear.
But Rogue Panda has figured out a way to make a seat post bag that NOT all those things. The Ripsey is streamlined, super lightweight, easy to use (once it’s on… I’ll go more into detail about that below), and allows you to remove your gear quickly and easily via a dry bag and harness system.
I was really impressed with Rogue Panda’s Ripsey and in this post, I share everything you need to know about this awesome system including how it works, how to install it, the pros and cons, who it’s for, and more.
Rogue Panda Ripsey
- System: Harness & dry bag
- Weight: 13 ounces with dry bag
- Dropper post compatible? Yes
- Dry bag volume: 8 liters
- Minimum tire clearance: 3″ (half-capacity); 4″ (full capacity)
- Load capacity: 6 lbs
- MSRP: $200 ($220 with dropper post clamp)
Pros
Cons
Where to shop:
Watch the Rispey in action
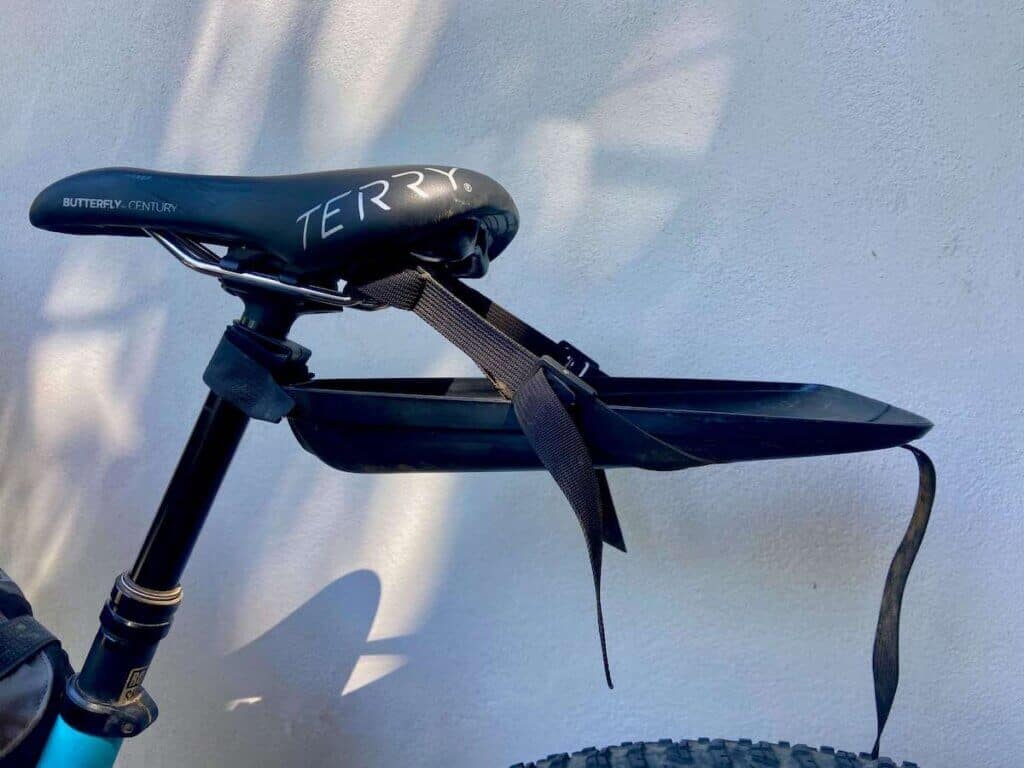
How the Ripsey Works
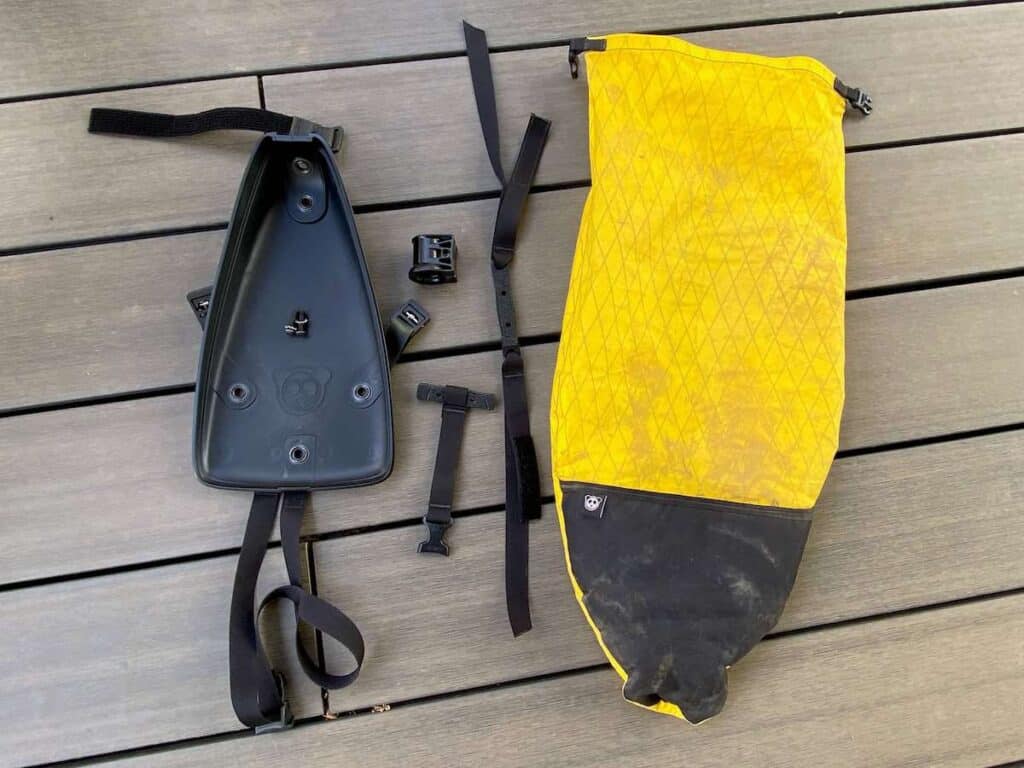
Harness & dry bag system
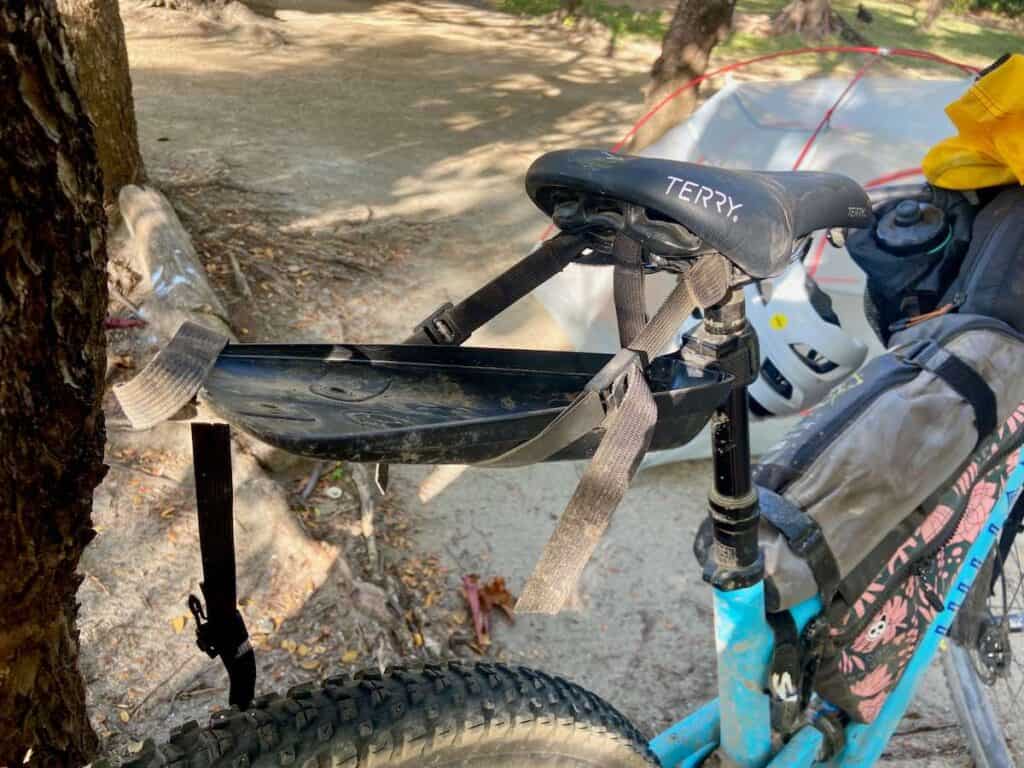
The Rispey is designed as a harness and dry bag system. This means that the harness stays attached to your bike throughout your trip while the dry bag can easily be removed/clipped in whenever you want.
As someone who has tried both a harness and a fixed system (where the bag stays attached to the bike), I am definitely a fan of the harness. They make packing/unpacking so much easier and you can really compress the dry bag down small before clipping it in.
Attaching the harness to your bike
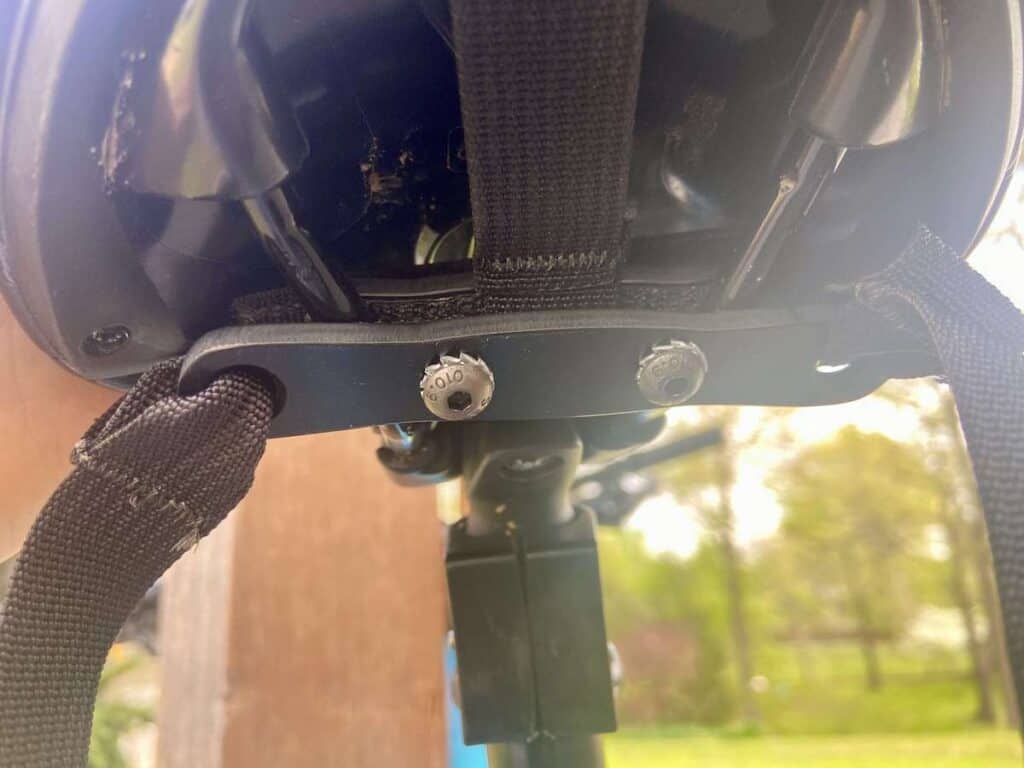
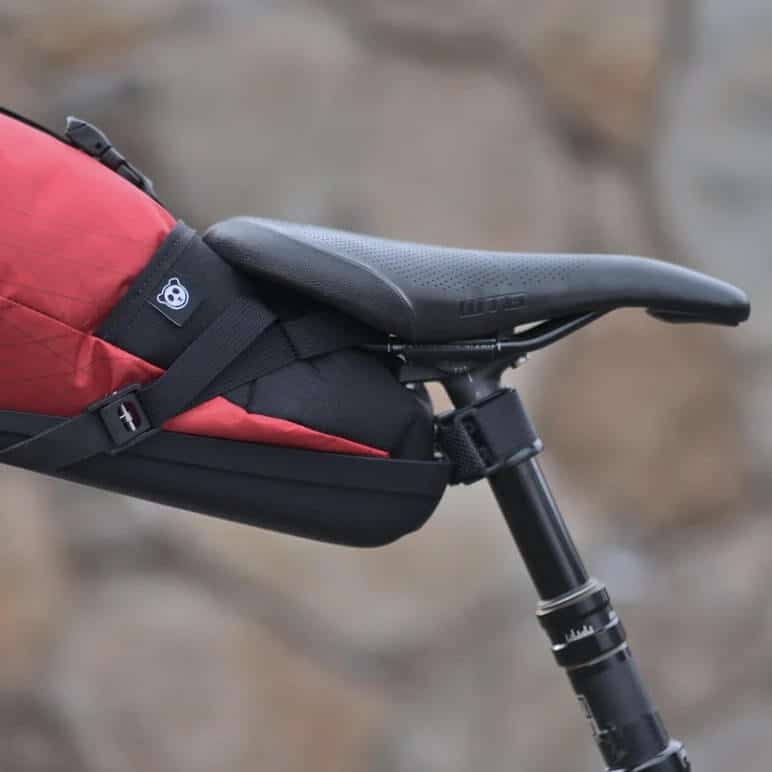
The harness attaches to your bike in two places: via the saddle rails and on the seat post stanchion.
Attachment at the saddle rails:
The harness is secured to the saddle rails by two rectangular pieces of metal. These two pieces of metal – which each have a layer of grippy rubber on one side – basically sandwich the rails and are secured together by two screws.
It’s a simple system, but actually very effective, and once the two plates are in place, you shouldn’t have to touch them throughout the entire trip.
Carbon Rails: It’s best to use a saddle that doesn’t have carbon rails since you’ll need to tighten the metal plates pretty snuggly with the two screws.
Attachment at the seat post:
The second point of attachment for the Ripsey is on the seat post. If you don’t have a dropper post (or don’t want to use your dropper post) you simply secure the velcro strap around the top of the seat post.
For dropper posts, you’ll need the Wolf Tooth Components Valais Clamp ($20), which allows the Ripsey harness to slide up and down on the stanchion.
Watch how to install the Ripsey
What I love about The Ripsey
The Ripsey has a lot of great features. Here are are some that stand out to me:
The removable dry bag (in your favorite color!)
I don’t think I’ll ever go back to a fixed seat post bag that doesn’t allow you to remove the dry bag filled with your clothes or gear.
Having a removable bag makes it so much easier to set up camp, access your essentials, and quickly pack up when it’s time to hit the road or trail again.
The Ripsey comes with an 8 L compressible, waterproof dry bag that fits snugly and securely in the harness.
You also get to choose from 16 different colors! The dry bags are hand-sewn in Flagstaff by Rogue Panda’s expert team.
Lightweight yet very durable
The whole Ripsey seat bag system weighs just 13 ounces, including the dry bag. That’s light!
But despite its minimalist design, it’s actually very durable and strong.
Nick, the founder of Rogue Panda, set up a stress test for the Ripsey harness plate to see if they could break it. They failed to break it with the test contraption, so they ran it over with a 4-runner and then crushed it in a hydraulic press and it still didn’t break! Watch the video here.
The buckles are also really impressive, too. There are two aluminum cam-strap buckles on either side of the harness to keep it taut and stable and one durable plastic snap buckle to secure the dry bag.
No sway
One of the biggest strong points of the Ripsey is that it is SOLID on the bike. I was really impressed with how little it sways back and forth, even when bombing down bumpy and rugged terrain.
I took the Ripsey for a ride in Prescott, Arizona before my Costa Rica trip and rode a steep, rough singletrack trail. I honestly didn’t even notice the bag or harness back there!
Dropper post compatible
If you have a dropper post, you can opt to get a Wolf Tooth Components Valais Clamp for an additional $20. This little clamp allows the Ripsey to raise and lower smoothly when using your dropper.
Rogue Panda recommends having at least 3″-4″ of minimum tire clearance (the space between your tire and seat at its lowest), depending on how full you plan on stuffing your dry bags.
TIP: To measure tire clearance on full-suspension bikes, Rogue Panda recommends measuring at 75% sag with the Wolf Tooth Valais clamp installed (or your dropper 1″ above its lowest position).
Shorter riders on smaller bikes can also add a skid plate to the bottom of their harness if they have less than 3″ of tire clearance.
What Could be Better
Honestly, there’s not a lot to nitpick about the Ripsey Seat Bag, I think it’s one of the best-designed harnesses out there. But if I have to be a critic, here are a few minor drawbacks:
The initial installation
As my friend put it, there are about “15 minutes of four-letter words” while installing the Ripsey Seat Bag. It is a bit of a pain to get the metal plates sandwiched and secured around the saddle rails. It can be frustrating, especially if your fingers aren’t small and nimble.
BUT, once you have the harness on, you won’t need to touch it for the rest of your trip.
I’ve also found that the process gets much easier and quicker once you do it a few times.
Small parts can be misplaced
The Ripsey has three separate main pieces, two small screws, and the Valais clamp if you choose the dropper post option.
Since the components are not one unit and there are some small parts, you’ll need to make sure you keep everything together in a bag or box when stored or not in use.
Who is the Ripsey for?
Everyone! The Ripsey can be used for all bikepacking adventures and for all bikepacking adventurers including:
The Ripsey truly is a versatile set-up designed for pretty much any two-wheeled adventure.
Why is it so expensive?
The Rispey, without the $20 dropper post clamp or $15 skid plate, is $200. I think anyone will agree that that is an investment for a piece of bikepacking gear.
So why is it expensive?
Aside from the fact that you get what you pay for (in this case, a very high-quality and durable seat bag and harness), the price also includes:
- Rigorous testing to make sure it’ll last many adventures
- Dry bags that are handsewn in Flagstaff, Arizona
- Components that are made in the USA
- Supporting a small, local business (they don’t get to average costs out over millions of units)
- Customizations – like 16 color choices! – that you won’t get anywhere else
I don’t know about you, but I would rather pay for quality gear that will last a long time than a subpar product that will only last a season or two.
How it Compares
Curious about how the Ripsey stacks up against other harness-style seat post bags with removable dry bags? Here are two similar options:
Rogue Panda Ripsey Seat Bag
Capacity: 8 Liters
Weight: 13 oz
Dropper post? Yes
Removable bag? Yes
Min. tire clearance: 3″
Price: $200-$235
Revelate Designs Terrapin
Capacity: 8 Liters
Weight: 17 oz
Dropper post? No
Removable bag? Yes
Min. tire clearance: 7″
Price: $179
Blackburn Designs Seat Pack
Capacity: 6.95 L Liters
Weight: 20.2 oz
Dropper post? *Yes
Removable bag? Yes
Min. tire clearance: Not specified
Price: $200
*The minimum tire clearance is not specified, so it’s hard to say whether it will work with a dropper post.
Final Thoughts
I was (and still am) really impressed with the Rogue Panda Rispey seat post bag. The more I bikepack, the more I’m trying to keep my set-up nice and light, and minimal.
The Ripsey weighs only 13 oz, yet can carry 8L of gear up to six pounds. During my Costa Rica trip, this included all of my clothing, my headlamp, and my toiletries. It was definitely under 6lbs, but I also could have added more.
I also really appreciate all of the testing and design that went into making the harness. Sure, it’s annoying to get on your bike, but once it’s on the whole system works incredibly well.
If you’re looking for a new seat bag set-up, I definitely recommend the Ripsey.
Happy trails!
RELATED POSTS
Looking for more bikepacking tips and gear? Check out these related blog posts:
What questions do you have about the Rogue Panda Rispey seat post bag? Are you interested in giving it a try? Leave a comment below!


I love hearing from you and appreciate your comments! However, if you leave a rude, unconstructive, or spammy comment, it will be deleted. It’s cool to be kind. Have an awesome day!